
How to Make Paper Snowflakes
Hey there, little crafters! ❄️ Want to make your own magical snowflakes just like the ones falling from the sky? Grab your scissors and let's create some winter wonderland magic together!
What You'll Need
Before we start, let's gather our snowflake-making supplies! You probably have everything at home:
White paper (square or rectangular)
Printer paper works great!
Scissors (kid-safe ones work best)
Ask a grown-up for help!
Pencil (optional, for drawing patterns)
Light marks are easier to cut
Flat surface to work on
A table or desk works perfectly
Step-by-Step Folding Guide
The secret to a perfect snowflake is in the folding! Follow these steps carefully:
Start with a Square
If your paper is rectangular, fold one corner to the opposite edge to make a triangle. Cut off the extra strip at the bottom.
💡 Tip: The triangle should be perfect - corners matching exactly!
Fold in Half
Take your triangle and fold it in half by bringing one pointed corner to meet the other pointed corner. You'll have a smaller triangle now!
💡 Tip: Press down firmly on the fold to make a crisp crease.
Fold into Thirds
This is the tricky part! Fold the left third of the triangle over to the center, then fold the right third over on top. It should look like a cone or ice cream shape!
💡 Tip: Don't worry if it's not perfect - snowflakes are unique!
Trim the Top
Cut off the uneven top at an angle or straight across. This creates the outer edge of your snowflake.
💡 Tip: A straight cut makes a hexagon, an angled cut makes a star shape!
Cutting Patterns
Now for the fun part - cutting! Here are some patterns you can try:
Classic Snowflake
- •Small triangles along the edges
- •Diamond shapes in the middle
- •Tiny notches on the fold
Lacy Snowflake
- •Many small cuts close together
- •Curved edges
- •Lots of tiny holes
Star Snowflake
- •Large triangle points
- •Big bold shapes
- •Simple geometric patterns
Heart Snowflake
- •Half-heart shapes on the fold
- •Curved cuts
- •Small hearts inside larger ones
Fun Christmas Designs
Want to make your snowflakes extra special? Try cutting these fun shapes:
Christmas Tree
Cut tiny triangle shapes to look like trees!
Candy Cane
Make curved 'J' shapes along the edges
Reindeer
Cut antler-like branching shapes
Bell
Rounded shapes that look like bells when unfolded
✨ Tips & Tricks
The more folds you make, the more detailed your snowflake will be!
Don't cut too close to the folded edge, or your snowflake might fall apart!
Use colored paper for fun, festive snowflakes!
Press your finished snowflake under a heavy book to make it flat!
Hang them in windows with tape or string them together for a garland!
Every snowflake is unique, just like real ones - mistakes make them special!
Printable Templates
Print these templates, fold your paper, and trace the pattern before cutting! Click any template to download and print it.
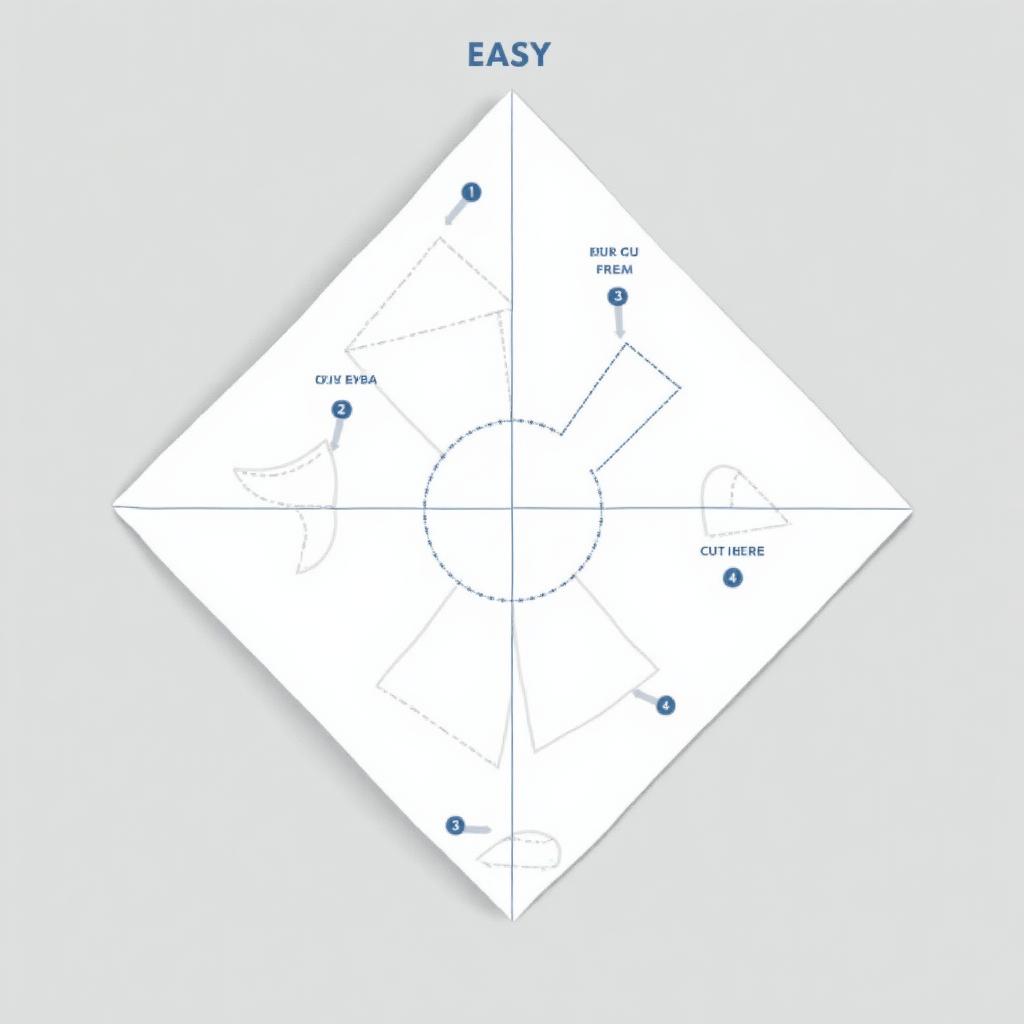
Easy Snowflake
Perfect for little ones! Simple cuts with beautiful results.
Download Template
How to Use Templates
- Download and print the template
- Fold your paper following our folding guide above
- Place the template on your folded paper and trace the pattern
- Cut along the traced lines and unfold your snowflake!
🧠 Snowflake Quiz!
1. What shape do you need to start with for a paper snowflake?
2. How many times should you fold the paper before cutting?
3. What happens if you cut too close to the folded edge?
4. How can you make your finished snowflake flat?
5. What makes every paper snowflake special?
Frequently Asked Questions
What type of paper is best for making snowflakes?
Regular white printer paper works great! You can also use tissue paper for delicate snowflakes, construction paper for sturdier ones, or even coffee filters for soft, pretty snowflakes. Thinner paper is easier to cut through multiple layers.
Why do my snowflakes keep falling apart?
You might be cutting too close to the folded edges. Make sure to leave some paper connecting the different parts of your design. Think of the folds as the 'skeleton' that holds everything together!
How do I hang paper snowflakes?
You can tape them directly to windows, use clear fishing line to hang them from the ceiling, attach them to string for a garland, or use removable poster putty on walls. They look magical catching the light!
Can I use colored paper?
Absolutely! Blue, silver, and light purple make beautiful snowflakes. You can even use patterned paper or decorate your white snowflakes with glitter after cutting them!
What age can kids start making paper snowflakes?
Kids as young as 4-5 can make simple snowflakes with help folding. Children 6-8 can do most steps with supervision. Older kids (8+) can usually make snowflakes independently. Always supervise scissor use!
❄️ You're Ready to Make Magic!
Now you have all the secrets to make beautiful paper snowflakes! Remember, every snowflake you make is unique and special, just like real snowflakes falling from the sky.
Hang your creations in windows, give them as gifts, or use them to decorate for Christmas! The more you practice, the more amazing your snowflakes will become.
Happy crafting, little snowflake artists! ❄️✂️🎄
Show Santa Your Snowflakes! 📞
Want to tell Santa about the amazing snowflakes you made? Call him on CallSantaClaus.ai and share your Christmas craft adventures!
Call Santa Now!